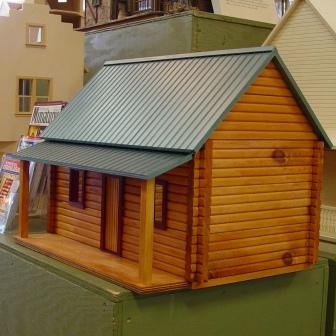
Faux "Tin Roof" Instructions

For a Printer Friendly Version, click here.
(These instructions were written for installing a tin look roof on the Lincoln log cabin dollhouse kit, but can readily be adapted for any dollhouse.) We also recommend that you mark the porch roof lines (as instructed below) before you install the main roof.
Materials and Tools Required:
- 28 strips of MW4022 (or MW4033) basswood (the number of pieces is based on the Lincoln log cabin, so the necessary amount would need to be calculated for any other dollhouse).
- DecoArt Elegant Finish metallic paint. We used Dark Patina #DA248 but, of course, you could consider any of the other colors available in metallic paint
- Clear drying wood glue or tacky craft glue (we recommend Grrrip or Alene’s)
- Glue bottle with metal tip (we used JAC1795 – ½ oz bottle with 5mm metal tip)
- Pencil
- Ruler or angle square
- Roof Ridge (we used AL93), cut to length
- Sharp craft knife, miter box, or miter cutter
- Paint brush
Instructions:
Beginning at the top left peak of the log cabin, make small measurement marks across the top of the roof 7/8” apart. Before drawing any lines, be sure that these marks are evenly spaced across the roof; adjust if necessary. NOTE: Due to changes in manufacturer specifications over time, it is necessary to double check that they have not changed the overall dimensions (width) of the cabin. These measurements were used on our model that was built in 2011.
Once you are happy with the spacing, repeat the measurements across the bottom edge of the roof (or use an angle square) to draw the lines from top to bottom. These lines will be used for applying your glue and wood strips for the “tin” ridges.
Repeat these instructions for the porch roof and for the rear roof of the cabin. Once all of your markings are complete, you will cut all of the pieces of wood strips to fit.
Measure the length of the main roof (top to bottom). Example: our roof measured 11-1/2 inches long. Cut enough pieces to cover the main roof front and main roof rear (long) edges. Repeat the measuring and cutting process for the porch roof and for the main roof rear top section. Once all of your wood strips are cut to size, you will glue them in place. Measure and cut the roof ridge (AL93) to fit the width of the cabin.
We used the Jacquard glue bottle with 5mm metal tip to apply a thin bead of glue along the penciled guidelines, we then set each wood strip in place, one at a time. Carefully line up each strip so that it is flush with the bottom edge and on the pencil line. You don’t want to apply more than one bead of glue at a time since the bead is very fine and may dry before you set the wood strips in place. Once each wood strip is set in place, carefully wipe any excess glue that may have oozed out from beneath the wood. Repeat until all the wood is installed on all three sections of the roof. Let dry overnight.
Apply one or two coats of metallic paint to each of the roof sections and on the top of the roof ridge strip. Follow drying instructions for the paint between applications. Allow paint to dry then glue the roof ridge in place.
Now step back and admire your “tin” roof!
 US Dollars
 Canadian Dollar
 Euro
Euro
 UK
UK
 Icelandic Króna
 Russian Ruble
 Swedish Krona
 South African Rand
