 US Dollars
 Canadian Dollar
 Euro
Euro
 UK
UK
 Icelandic Króna
 Russian Ruble
 Swedish Krona
 South African Rand

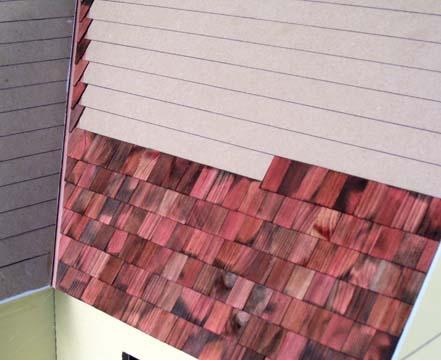
Some day I hope to create a video on how to shingle a dollhouse, but for the time being, I suggest you take a look at the link (at the end of this post) with a series of photographs explaining the process I generally use.
If you are not installing a copper flashing in the valley, you will need to be a little more careful when cutting and installing the shingles as they will have a little lift resulting from the overlap. Just be aware of this and basically butt the shingles against each other on each side of the valley. I recommend that you cut the shingles to the appropriate angle then install them up the entire height of the roof valley (gable or dormer) on both sides before proceeding to the rest of each row.
You can then continue as the instructions show or you can work from the gable (or dormer) to the outer edge of the roof. As you move along each row, you will discover that the alternating overlap pattern will change. Use an "adjustment" shingle (one cut to the necessary width that will align the appropriate alternating overlap pattern of the row). Remember you want the space between shingles in each row to line up with the center of a shingle in the previous row.
If you use the alternative method, run each row of shingles across to the end of the roof line and allow them to overhang the outer edge of the roof. Allow the glue to dry completely (about 24 hours) then using a utility knife with a fresh blade, slice off the excess shingles using the roof edge as a guide for a continuous straight line. If you are not comfortable trimming off the excess shingles using this method, follow the instructions and cut the end shingles to fit the space. Be aware that the last shingle space may or may not be a full or half shingle width if you work from the valley out.
In either method, you will need to install at least one adjustment shingle on each row to maintain the alternating shingle gap pattern. Keep this in mind when using decorative shingles such as hexagon or fish scale designs as you will need to consider how to cut the adjustment shingle while maintaining a pleasing pattern.
If I were to add any information to the process, I would recommend you apply a single bead of glue (such as Magna-Tac or Multi-Grip) just below the lines you've drawn for the shingles. I recommend running a bead of glue in increments of 12" to 18" which allows you plenty of time to lay a series of shingles along the row before the glue begins to set. It's also a safeguard should you be interrupted while installing the shingles. You can generally install that number of shingles within a couple minutes when working with the shingles that are ready to be laid in place.
Finally, a few recommendations:
- I would suggest when building a dollhouse from a kit, be sure to draw the shingle guidelines on the roof pieces before assembly. Trust me is does make it easier to measure, mark and draw them.
- If you intend to dye or stain the shingles, do so before installing with sufficient time for the color to dry.
- While there are those who use a glue gun and hot glue to install dollhouse shingles, I do not for various reasons.
Here's the link to the dollhouse shingling method I recommend.