 US Dollars
 Canadian Dollar
 Euro
Euro
 UK
UK
 Icelandic Króna
 Russian Ruble
 Swedish Krona
 South African Rand

Dollhouse aficionados often fall into different camps when it comes to "vintage" dollhouses. Some love the resulting character (age, wear and tear) of a dollhouse that shows it's been loved through the decades or may have spent some time tucked away in an attic or basement. Others feel the need to renovate and redecorate the scarred and battered miniature mansion.
Every time I am involved in the renewal of a dollhouse I love to hear the stories behind its history and understand why the owner is compelled to either just freshen it up or totally renovate. Sometimes the choice is mine, but I always want the owner's input before I remove a single sheet of stained wallpaper or battered carpet. From roof to foundation, there are many areas to address in an update or restoration.
One of my favorite projects was a simple four-room dollhouse from the 1930's that was intended to be handed down to a great granddaughter. The little house was structurally sound and really needed only a good cleaning and paint. The roof had been hand-painted to look like shingles and the structured itself was made from a Georgia Peaches crate. With a little color matching and a good scrubbing, the delightful little structure was restored to its simple beauty and brought tears of joy to the original owner. An added bonus was the squeal of delight from the young new home owner. Alias, I do not have pictures of that sweet little cottage, but today I thought I'd share another more current renovation.

This little sweetheart is about 40 years old and has seen it's lifetime of loving and storage. It arrived looking very battered and stained. It hinted at a period of moisture while the broken windows and damaged trim brought a haunted house to mind. Instinctively I feel that another owner would have relegated it to a Halloween decoration filled with ghosts and ghouls and ghastly furnishings. This owner, however, wanted to take it back in time (or as close as possible) to when she first received it...as a delightful gift from a father who admittedly didn't quite fit the bill as a builder or craft person, but who did his best to build a dollhouse for his little girl.
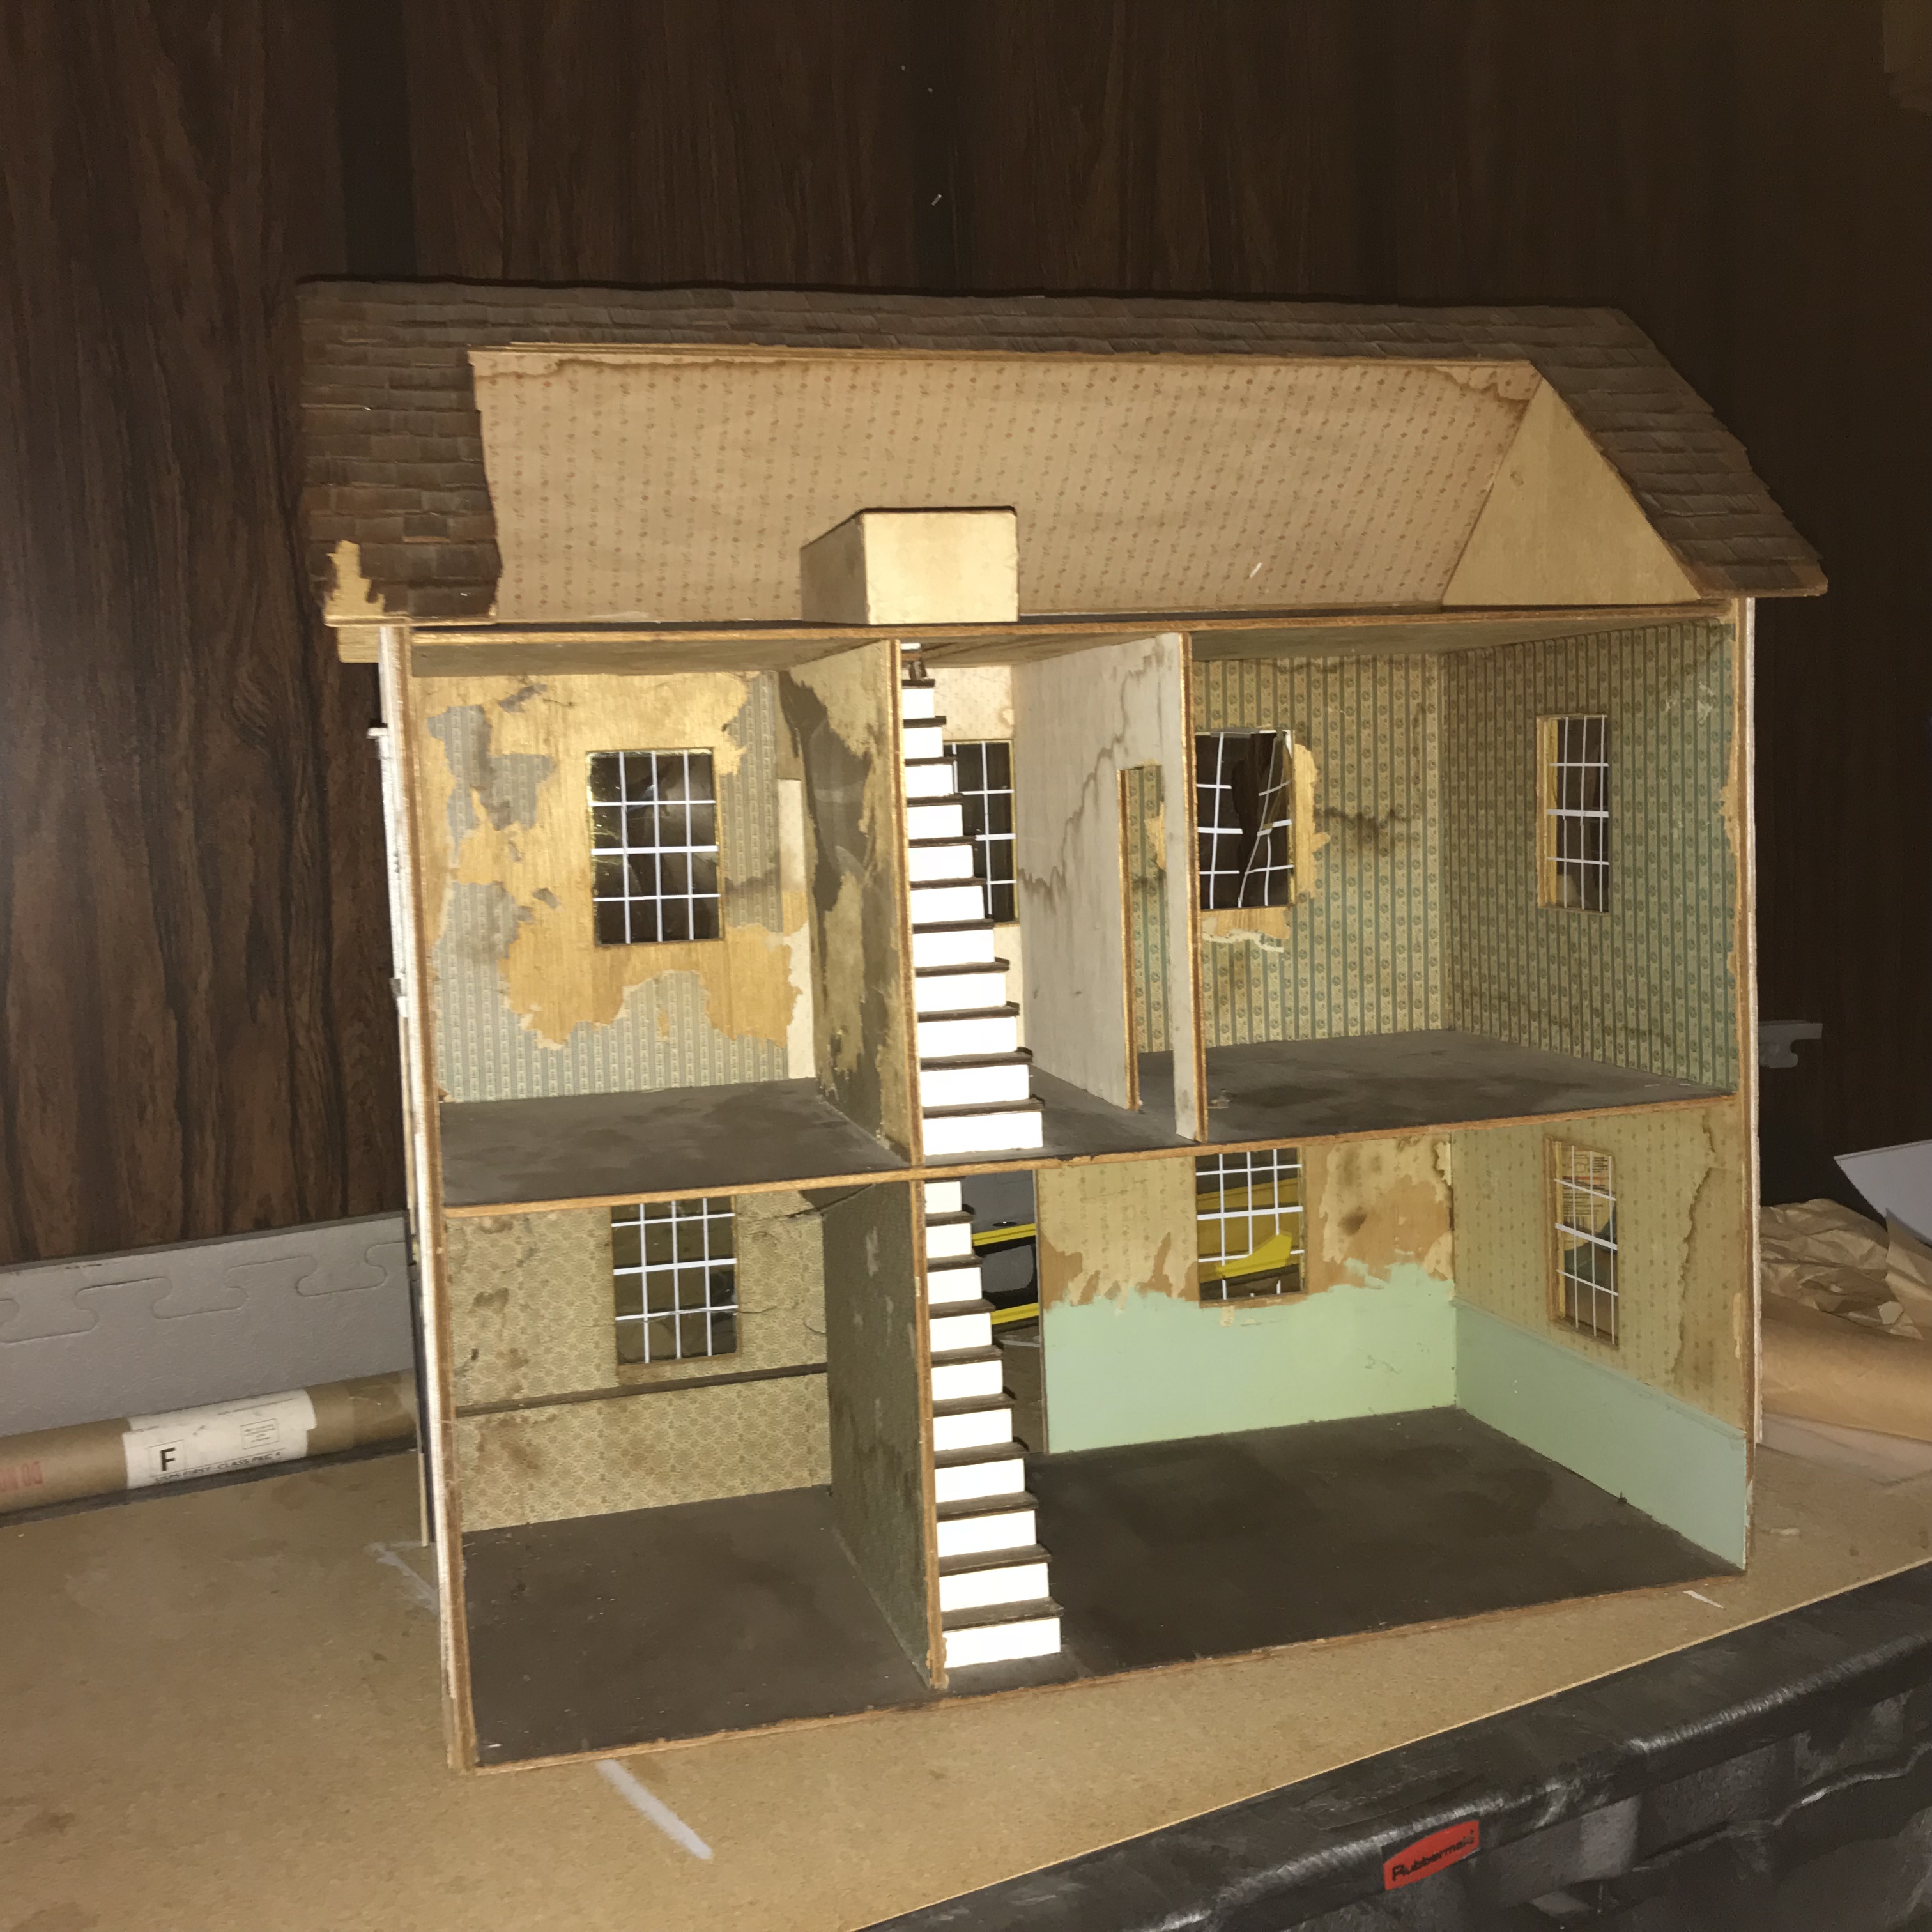
The easy part was repairing and replacing a few missing shingles. I must admit Dad did a great job of securing them down as only a couple shingles managed to come loose. More shingles suffered from battered edge syndrome and required some serious digging and tugging (think pulling teeth) to be removed. Reinstalling a handful of new shingles, a little color stain matching and a few swipes with a clean paintbrush to remove the dust brought the roof back pretty close to its original look.
The windows proved to be just a little bit of a challenge as they were silk screened (non-standard size) plastic panes in wood frames. We salvaged the frames and recreated the panes using thin wood strips and mimicking the original panes by using one of the battered window panes as a template. A couple sheets of clear plastic cut to fit and we had new windows that looked like the original.
At first we thought we would try to match the wallpapers, and while we might find one or two of them still floating around miniature shops or online, we decided to just select a group of fresh new papers for the rooms. With choices complete, it was time to remove the old torn and stained papers. This is rarely one of my favorite parts in remodeling (a dollhouse or real life house), but with bucket of warm water, a dash of fabric softener, a soft rag and a putty knife, most of the wallpaper easily crumbled in heaps to the dusty floors. I basically dipped the soft rag into the fabric softener infused water, then dampened the walls (working on one room at a time), waited a few minutes, then gently scraped away the wallpaper with the putty knife. OK, I admit there were a few places and walls that I got a little more aggressive! As an aside, the fabric softener scent really helps freshen up the musty smell of the old house. I also gave every wall and each ceiling a coat of white primer which will help keep the wallpaper looking bright and reflect more light into the rooms from the ceilings.
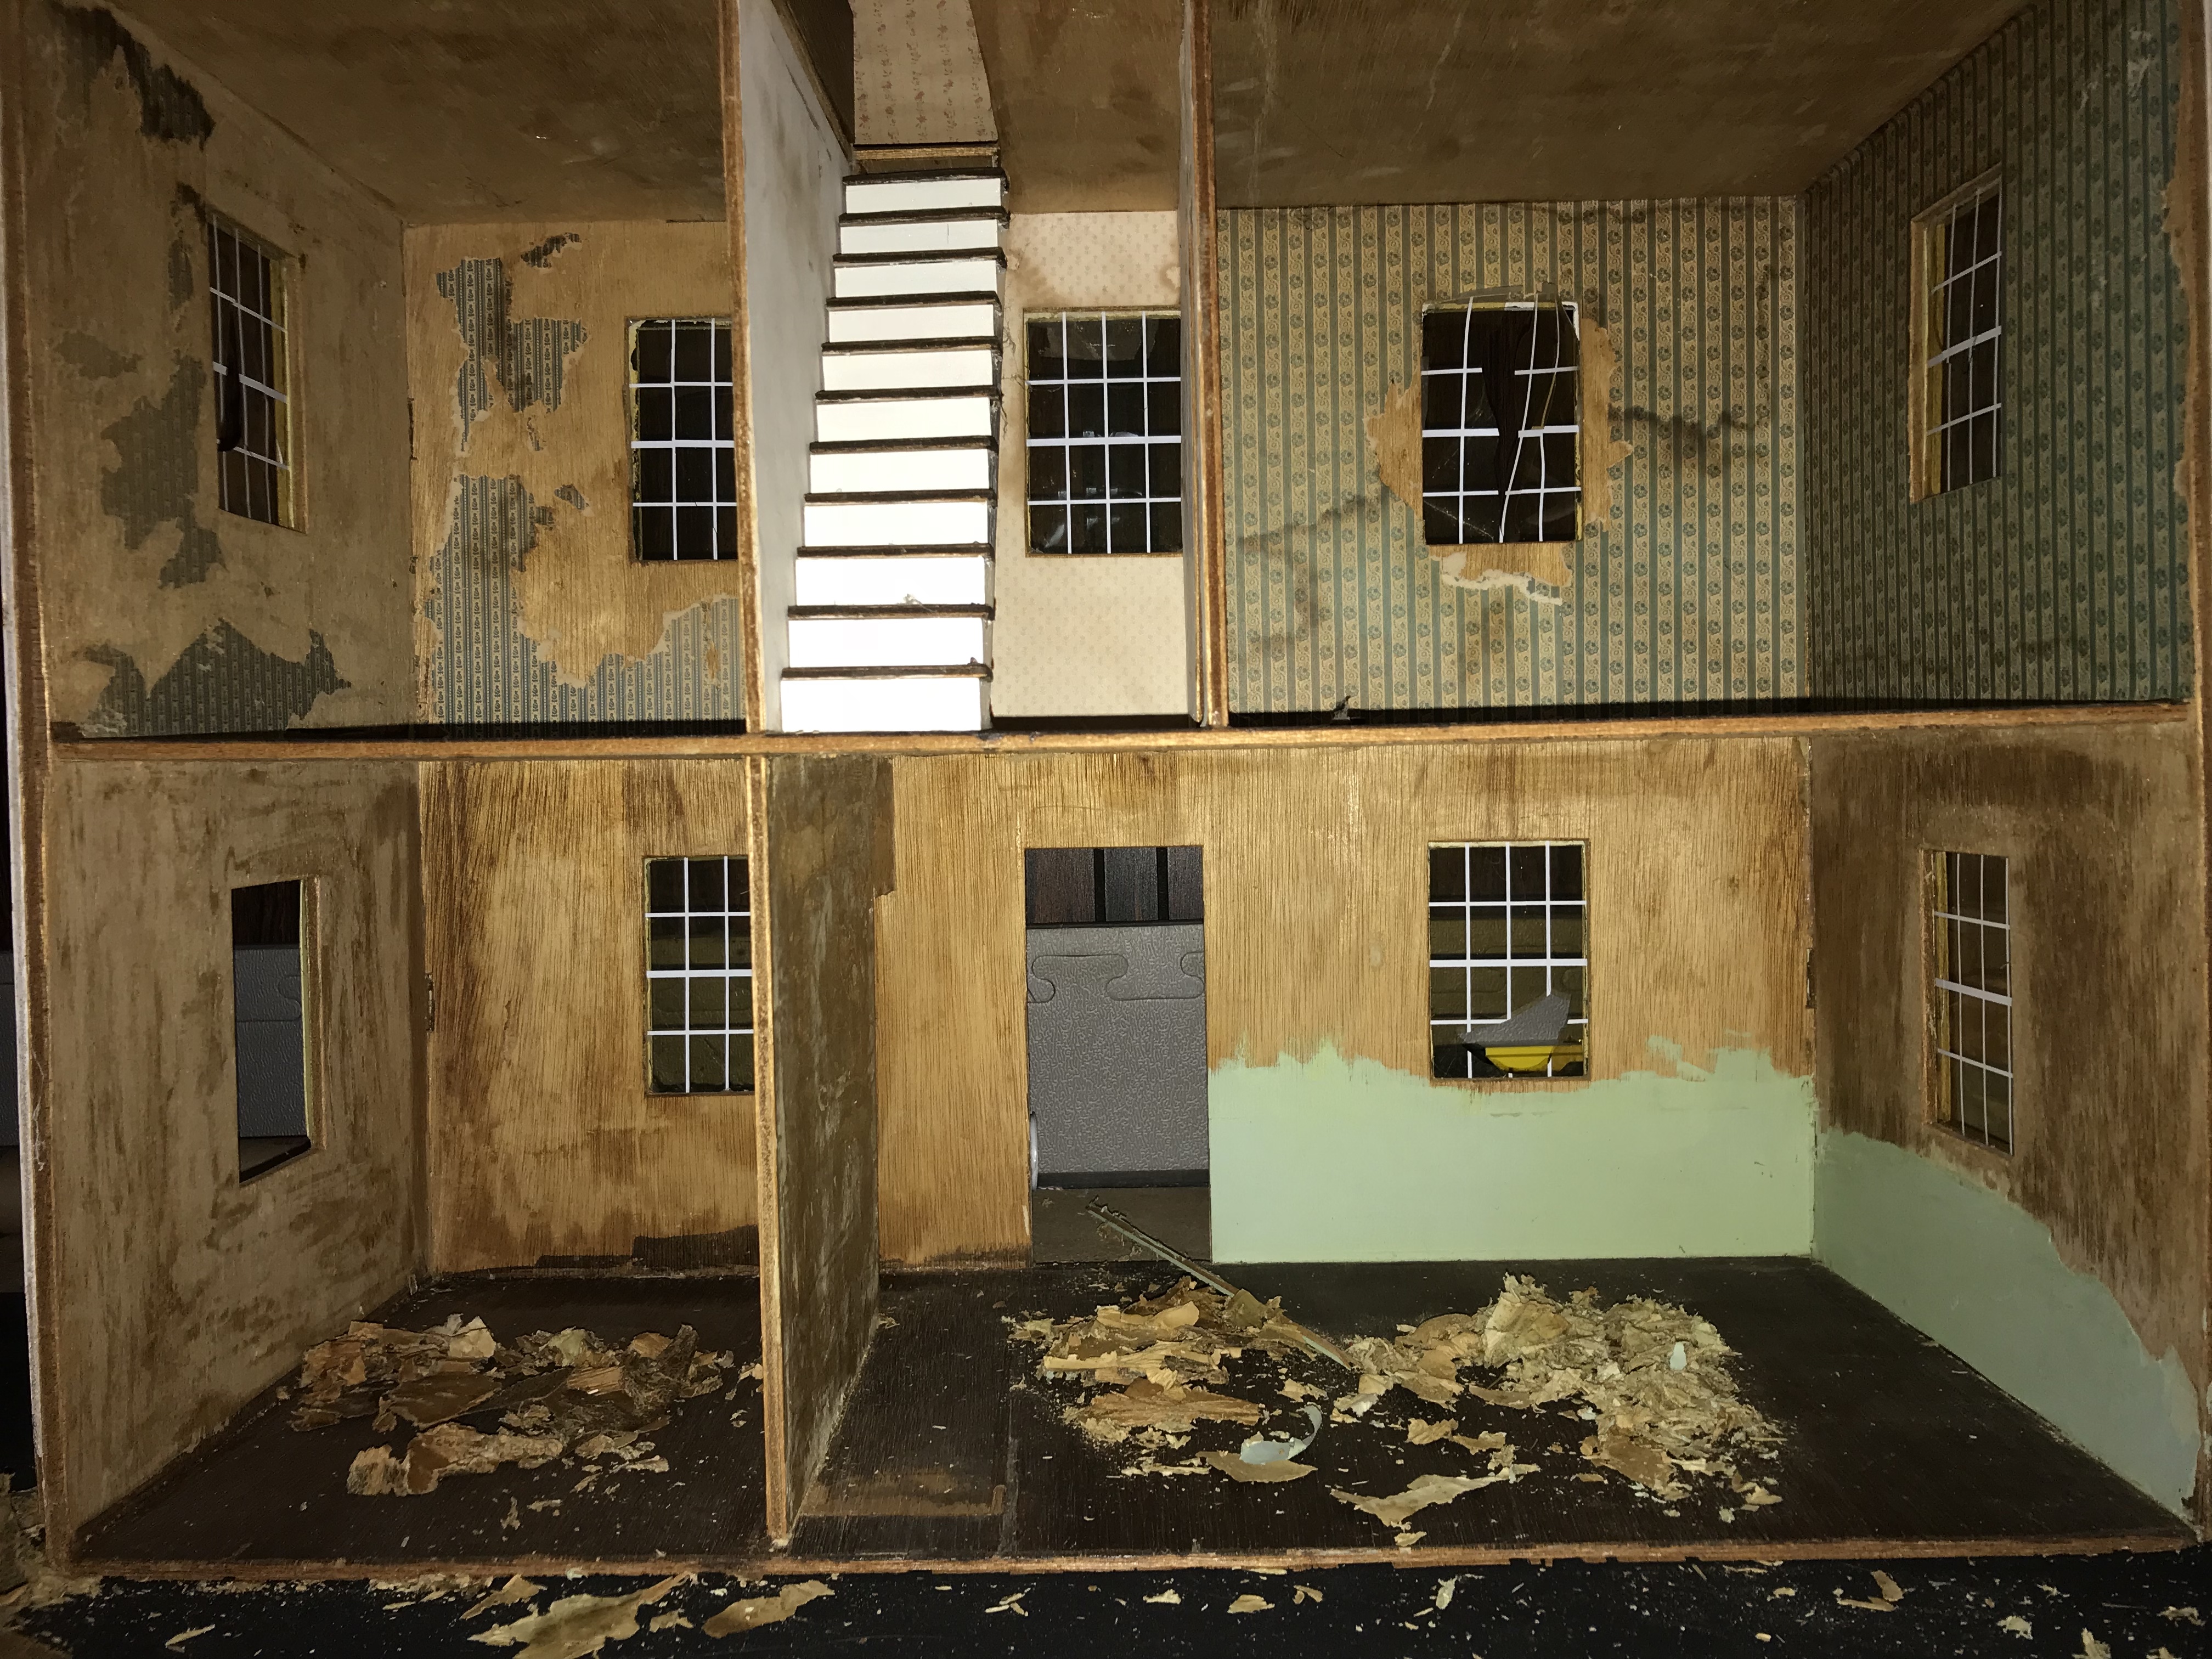
One of the most difficult parts of this remodel was removing the staircases. Keep in mind that the entire house is made from a thin, now dry and brittle wood and Dad really loved his glue! After some serious prying with the putty knife and a little gentle rocking, the staircases came loose. I did not relish or intend on wallpapering up the steps of the walls, especially in the second floor hall where I could barely squeeze my hand in alongside the staircase. As an aside, the stairs did at one time have railings (we think) as there were the remnants of spindles on each step. Once the stairs were removed, I used a craft knife and gently scraped away the remains. A little wood stain and you could barely tell the spindles ever existed.
I will admit, I'm a big fan of baseboards and crown or cove molding. Just as in real life, these little details also hide all those little irregularities and "oops" that result from off square walls or slight measurement mistakes. Since her original dollhouse did not have any of these details (or doors, or casings), I had to be sure I was extra careful measuring, cutting and installing the wallpapers. Fortunately, again thanks to Dad the rooms were pretty square and even! Interestingly enough, there were no complete door frames on either the first or second floor. In order to finish off the rooms, I just added a little strip of wood to simulate the door frames and make it a bit easier to delineate the wallpaper in each room. I find bits of strip wood help mask many irregularities very inexpensively. Finally, the wallpapering was complete.

As the renovation wound down, I had only a few exterior touch-ups to complete. As you can see in the first photograph, the plastic siding had begun to curl away from the walls. This is the result of the glue having gone dry and brittle over the years, the window and door casements looked tired and yellowed, and several of the shutters had fluttered away over the years. Keep in mind, we were trying to maintain the feel of the original dollhouse. The original shutters were plastic and slightly smaller than the current commercially available dollhouse shutters today, so we used all the original shutters on the front of the house and installed new wood shutters on the sides of the house. All the trim molding along the exterior edges was removed and replaced with freshly painted new stripwood. The plastic siding on the front and sides of the house, which basically fell off when I removed the window frames and what was left of the original trims, got a good wipe down and was glued back in place. A cleaning and couple of coats of paint finished off the door and window frames.
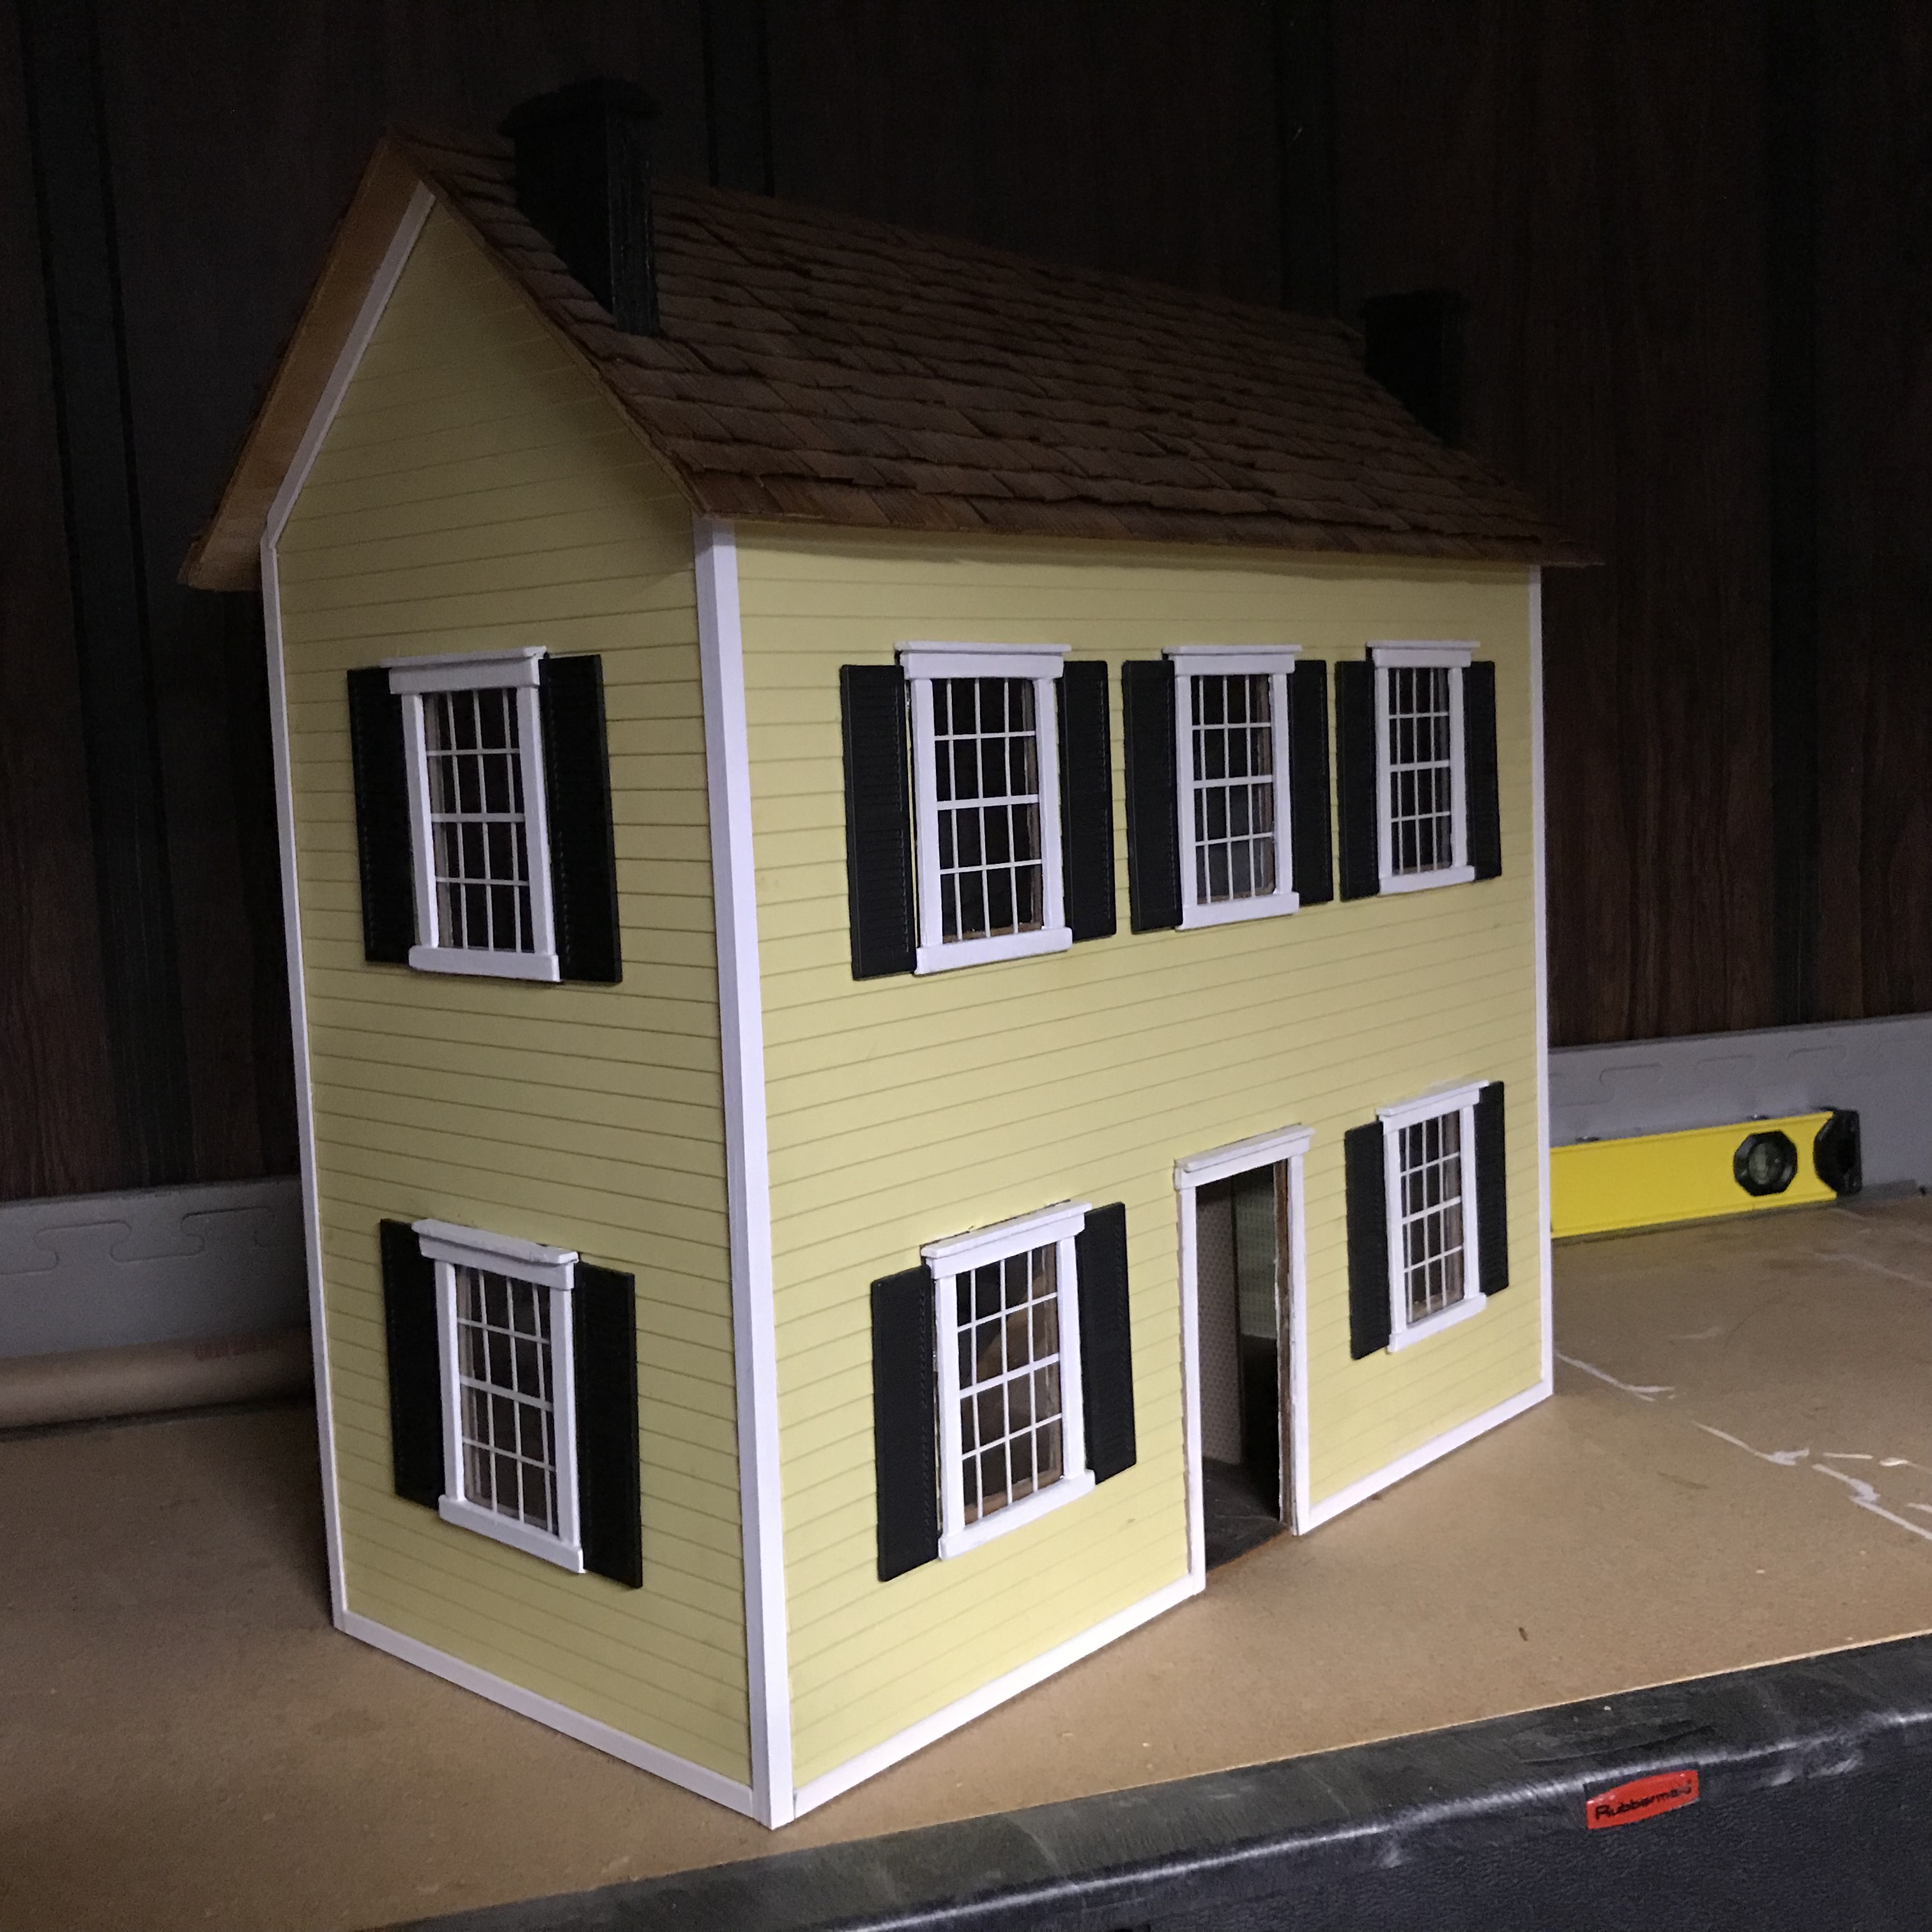
So we kept most of the dollhouse true to what was originally done and fixed most of the dings and damage. You might ask about the front door...well the owner didn't remember there ever being one so she said let's just leave it open. My guess is there was a door at one time, but what the heck it's a dollhouse overflowing with fond memories that's now ready for many more years of love and hours of play!